 How to Repair an Image in PhotoShop
Introduction | Step 1 | Step 2 | Step 3 | Step 4 | Step 5 | Step 6 | Step 7 | Step 8 | Step 9 | Step 10 | Step 11 | Step 12
Adobe PhotoShop repair, retouching and restoration techinques for beginners.
What's the best way to learn Photoshop?
 If you are brand new to Adobe PhotoShop, then a great way to get started at an entry level is to learn the basics of image repair and retouching and photo restoration techniques. In fact, image restoration in PhotoShop introduces many of the tools and basic design techniques which will help you to get a grounding in using PhotoShop for graphic design and image compositing later on.
This is not only a good pathway to pick up some PhotoShop fundamentals, it is also a very practical approach to learning PhotoShop since most of us have at least a couple of dog-eared old photos laying around which would benefit from a makeover.
The following image repair techniques will work in any version of PhotoShop from older versions of Creative Suite right through to the latest update of Creative Cloud.
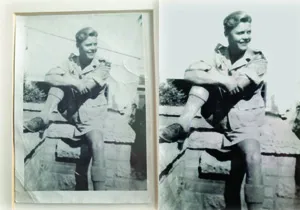
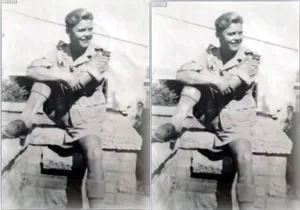
The image that we are going to work with has many problems, including, scratches, stains and creases to mention only the most noticeable ones. Then there's the telegraph line which cuts straight across the figure's head, making him look a bit like he's been shot through the brain with a very long arrow. We're going to quickly mend all of this during this step-by-step guide, but we're not going to go into great detail or over complicate things at this stage.
Let's start off by taking a look at the image before and after its restoration.
PhotoShop Image Restoration in Brief.
What's the best way to repair an image in PhotoShop?
In a nutshell you can use the quick tips in the list below to repair images in Photoshop. We will go into each in more detail as we progress through the image restoration process.
- Get rid of the excess space around your photo with the Crop Tool - Opens with shortcut key C.
- Use Auto Levels, Auto Contrast and Auto Colour for some quick wins. Go to Image > Adjustments.
- Use the Healing Brush to fix marks and scratches. CTRL and J for Windows (CMD and J for a MAC). Use ALT to set the healing source area.
- Use the Dodge Tool to reduce the visibility of stains and creases: Use the shortcut SHIFT and O to open the Dodge Tool. Set the exposure higher to lighten or set the exposure lower to darken the area that you are repairing.
- Reduce Noise with the Dust and Scratches Filter. Go to Filters > Noise > Dust and Scratches.
- Remove unwanted objects with the Clone Stamp Tool. Use the shortcut S to open. Use the ALT key to set the source area to clone from.
The full explanation:
1) Digitise your photo.
The first thing that we need to do is to digitise our photograph so that we can start to work on it.
You can scan your photo onto your computer using a scanner. Or, if you don't have a scanner (or just don't want to do things the retro way) you can take a photo of your image with a digital camera and then upload to your PC or MAC. Most smart phones will do the job just fine, and we used the camera on a Samsung Galaxy S9. In fact, for this demonstration we didn't even remove the photograph from its frame.
Photography TIP: Remember to turn off the camera flash to take this photo as we don't want any reflection on it.
Copy the image from your phone to your PC or MAC.
2) Open your Image in PhotoShop.
In Windows, select your image and then: Right Click > Open With > Adobe PhotoShop.
You will want to keep a copy of your original image. There are a number of ways of doing this. You can simply copy and paste a copy of the image into the folder where you put the original. Or, once you have PhotoShop open you can create a new image layer.
Go to Layer > Duplicate Layer.
Now name your layer and hit enter. You will see that you now have two layers. The one that you just created and also a background layer which will serve as a back up of your original photograph. We will be working on the new layer.
PhotoShop TIP: If you get stuck at any point and want to UnDo your last action, use CTRL and Z in Windows or CMD and Z for MAC.
3) Resize and Rotate Your Image
If your image isn't 'right-side-up' when you opened it in PhotoShop, then go to Image > Rotate Canvas and select Clockwise (CW) or Counter Clockwise (CCW) to orient your photo in the right direction.
Next, we want to have a look at the image size.
Go to the top menu and select Image > Image Size.
The chances are that a digital photo is going to start out with dimensions in the thousands of pixels on both the horizontal and vertical axis.
So, let's bring this under control so that we have an image that's easier to work with.
There are a few methods that we can use to do this, one of which is to re-size the image. However, we can also simply fit the image to screen, so that the image is more user friendly for editing, but doesn't lose any of its high resolution.
To do this go to View > Fit to Screen.
4) Cropping Your Image
Now we are getting into the actual nitty gritty of our restoration work.
Our first restoration task in PhotoShop is going to be to crop our image. We can do this to remove anything outside of the edges of photo area (e.g. unwanted white space) which doesn't belong there and we can even crop the margin area of the photo to remove any imperfections.
To do this we need to open the Crop Tool.
The fastest way to open the Crop Tool is to use the shortcut key for it. This is simply just the letter C. Hold down the letter C on your keyboard and then move your mouse over the image and you will see the Crop Tool icon appear over your photo.
A Quick Word on Aspect Ratios in PhotoShop
When we have the Crop Tool open you will notice that the Options Bar now displays editable height and width options and we can use these to set the Aspect Ratio of our crop which is going to be very useful if we later want to put our image in a photo frame. Common Aspect Ratios for photo frames are 2:3, 4:5 and 5:7. For social media 2:3 would be the ratio for a regular iPhone portrait and 1.85:1 or 2.39:1 would give you a cinematic landscape ratio. For a profile photo a 1:1 aspect ratio is usually best and for a Microsoft Teams background you can use either 4:3 (standard camera) or 16:12 (widescreen). You can experiment with aspect ratios before taking your crop so that you can choose the ratio which best suits your image. Don't worry too much about dimensions here (cm or inches) as what we are concerned with is the ratio between width and height rather than absolute size.
If you are struggling to work out your aspect ratio then you can use our Aspect Ratio calculator tool here: Free Aspect Ratio calculator.
Place the Crop Tool over the top left edge of the image where you want to start cropping from. Click on the Crop Tool icon and then drag your mouse to fit the area that you want to crop.
Release your mouse button when you have the area more or less right for you.
This gives us an editable area whereby we can increase or decrease the dimensions horizontally or vertically using the square boxes on the crop area circumference guides.
Now, move the squares in the corners of the Crop area with your mouse to put the Crop guidelines precisely where you want them to be and hit enter (in Windows), or Return (in MAC).
PhotoShop Cropping Tip: You can also use you arow keys to reposition the crop area.
5) Changing the Image Orientation
If there is a bit of a slant to your image, you can also fix this using the Crop Tool. This can be useful, for instance, if your horizon is at an angle, or your main subject is skewed.
In more recent versions of PhotoShop (CS6, CC) when you have the Crop Tool open you can select the Straighten Tool. Once you have the Straighten Tool open, drag your mouse across your image (horizontally or vertically) over the object/area that is lop-sided. This is a bit like using a spirit level. When you release your mouse PhotoShop will rotate your image for you and also re-size the image so that there is no bleed around the edges. Click on the Delete Cropped Pixels checkbox if you also want PhotoShop to delete the excess pixels that have been cropped.
You can also fix a skewed page using the good old-fashioned Ruler Tool. Use CTRL and R (Windows) or CMD and R (MAC) to open the ruler guides. You can use the ruler guides to draw a line to adjust the skew of the image. This will work in older versions of Creative Suite.
6) Rotate Your Image.
You may also want to rotate your image. This particular example didn't need any significant rotation but if you need to do this go to Image > Image Rotation (Rotate Canvas if you are using an older version).
Or, go to Edit > Transform > Rotate.
Rotate the image as you require.
We've now reached the interesting stuff where we are actually going to start fixing our image in PhotoShop.
7) Auto Levels, Auto Contrast and Auto Color
In this stage we are going to let PhotoShop do some of the heavy lifting for us by trying out its automatic adjustments for levels, contrast and color.
We're just going to try these out and see what improvements they bring to the image (or not), and we can either accept the changes or UnDo them (CTRL and Z for Windows, CMD and Z for MAC).
Go to Image, Adjustments and Auto Levels. Then also try Auto Contrast and Auto Color.
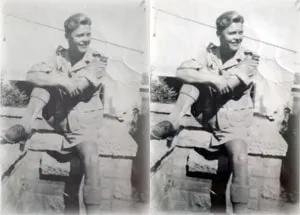
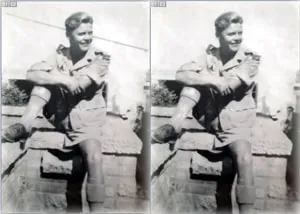
The changes can be quite subtle, so a lot is going to depend upon your own judgement. In the changes we made here the biggest improvement by far came from Auto Levels with other alterations not really affecting the percievable image quality one way or the other. Here's the before and after of our work at the point at which we applied Auto Levels:
There's plenty more to go at when it comes to the Adjustments menu including Brightness / Contrast, Color Balance, Exposure, Hue and Saturation, but you can find out about these later as you start to learn more about Photoshop. For now we're simply interested in getting some of the bigger wins from restoring our photograph.
8) Fixing Marks and Scratches with the Healing Brush
Now we're going to look for imperfections on our photo and we are going to mend these blemishes with the Healing Brush.
In order to open the Healing Brush use the shortcut CTRL and J (CMD and J for a MAC) - The icon for the Healing Brush looks a bit like a sticking plaster, or band aid (if you're in the USA).
Once the Healing Brush is open, select the brush size you need. We are working with a high resolution image so we will need a larger brush size. In this example we used 60 pixels.
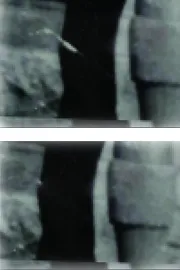
First, we are going to fix the scratch over the shadow on the left leg of the figure in the photo.
Select the source area for the heal using ALT and then use your mouse to heal the damaged area.
You will notice that there was a scratch both on the shadow of the leg and on the brick so we had to repeat the process twice, taking a different source area to heal each part of the damage.
We used the same process with the Healing Brush to start to reduce the visibility of some of the creases on the photograph as well.
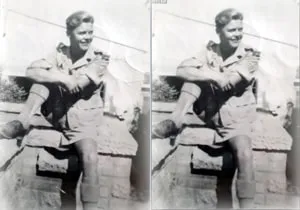
Here's the before and after to show what we've achieved with the Healing Brush:
9) The Dodge Tool and Stain Removal.
In order to deal with the stains on the photo we are going to use the Dodge Tool to lighten them so that they blend into the rest of the photo.
To open the Dodge Tool use the shortcut SHIFT and O.
Set the exposure higher to lighten or set the exposure lower to darken the area that you are repairing. In order to get rid of these dark stains we set the exposure to 86 percent so that it matches the lighting in the surrounding areas of background. And, you will again use a larger brush size if you are working with a higher resolution image. In this instance we used a brush size of 100 pixels for a lot of the work, only using a smaller brush size of 20 pixels for some of the detailed work.
You may need to go over the area repeatedly with your mouse until you get the desired effect.
In this instance, we also used the Dodge Tool to further hide the creases in the image, as well as tackling the worst of the staining. The Dodge Tool also proved very useful for reducing the visibility of the shadow or stain on the subject figure's right sock (the left sock from our perspective).
10) Reduce Noise with the Dust and Scratches Filter
Our next task is to clean the image a little bit more by reducing the dust and scratches that are visible.
In order to do this we are going to use a Filter. Go to Filters > Noise > Dust and Scratches.
Once open, we have two variables to adjust which are Radius and Threshold. It will take some experimentation with the sliders (and a little bit of patience) to get the desired effect.
☆ ☆ ☆ ☆ ☆ Five Star Review
A big thank you to NHS Aintree for the wine and flowers.
We're glad you enjoyed your training.
Creative Cloud Training Liverpool
More like this...
11) Remove Unwanted Objects with the Clone Stamp Tool
In this stage we are going to get rid of the telegraph wire which cuts across our subject's head. In order to do this we are going to use the Clone Stamp Tool. To open the tool use shortcut S.
Select the source to clone using the ALT key and then use your mouse to apply the stamp over the desired area.
For a finishing touch we are just going to increase the brightness and contrast ever so slightly. Go to Image > Adjustments > Brightness/Contrast. Then, adjust the sliders to get the best result.
12) Enhance the Colour and Richness of Your Image with Hue and Saturation
Finally, we are going to adjust the hue and saturation of our image.
Go to Image > Adjustments > Hue/Saturation.
We are going to use the sliders to decrease the Lightness and increase the Saturation slightly.
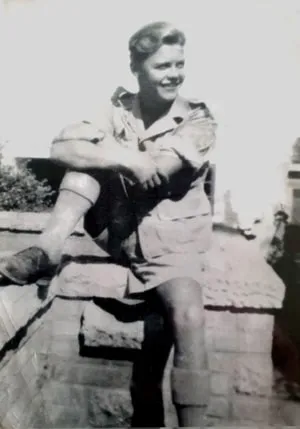
Changing the hue and saturation has made a great impact upon the image quality here, but it has also revealed a few flaws in the photo which I went back and fixed up using techniques that we already encountered earlier. This gave us our finished image and the final result of our photo restoration project.
Desktop Publishing & Adobe Training Courses
-- Adobe Illustrator Beginners
-- Adobe InDesign For Multimedia PDFs
-- Adobe Photoshop Intermediate
-- SLR Digital Photography with Photoshop
-- Adobe Premiere Pro Beginners
-- Adobe Premiere Pro Advanced
-- Adobe Dreamweaver Beginners/Advanced
-- Adobe Muse
-- Adobe Acrobat Intermediate/Advanced Training
-- Creative Cloud Master Class
-- Creative Cloud Essentials Course
-- Articulate Storyline 360 Beginners
-- Articulate Rise 360 Beginners
-- Articulate Storyline 360 Advanced
Back to top
Desktop Publishing & Adobe Software Training Reviews from our UK Clients
☆ ☆ ☆ ☆ ☆ Five Star Review
We really enjoyed our training
and learnt a lot.
PhotoShop Training Manchester
Just wanted to put on record how pleased we were with the standard of training we received last week. The trainer is a credit to your organisation and we will certainly not hesitate in organising training through yourself again as required in the future.
M Roberts, Cheshire and Wirral Partnership NHS Foundation Trust (PhotoShop beginners training Chester)
I've been getting some feedback from our delegates saying that they enjoyed their day immensely, got so much out of it and thought that their trainer was ace!
E Stephenson, Studio Cambridge (Beginners Illustrator Training Cambridge)
I just wanted to let you know that we had a fantastic time yesterday in your training session! What a fab, funny enthusiastic lady. We're all feeling a bit more confident now in using this tool in our jobs. Can you pass on our best wishes to her.
C Farthing, Sue Ryder (Beginners PhotoShop Training Northampton)
I just wanted to drop you a quick note to say thank you to the trainer for the training on Friday. Everyone really enjoyed it and we found it really beneficial. We do hope to use you again in the future for other training purposes.
C Boothroyd, Bako North Western Ltd (PhotoShop and InDesign Training Preston)
The trainer was lovely and incredibly helpful tailoring the training to our needs, please pass on our thanks.
D Kilty, Hitchcock Wright and Partners (Adobe InDesign Training Liverpool)
Very Enjoyable! Lovely tutor and very interesting course
A Hemingway, Wakefield City Council (Adobe Acrobat training Wakefield, West Yorkshire)
Excellent
L Bhardwaj (PhotoShop training Blaby Leicestershire)
A fantastic tutor, made the whole experience very enjoyable.
R Sharma-Slessor, Depuy Spine (a Jonson & Jonson Company) (Adobe Photoshop and Indesign Training Leeds, West Yorkshire)
Very informative course with lots of helpful advice and good practice.
M Hamilton, Canon Slade School (Dreamweaver Training workshop Bolton Lancashire)
Really enjoyable and worthwhile.
L Maycock, Trutex Ltd (QuarkXpress Beginners Training Clitheroe Lancashire)
[The trainer] has been great to work with. I really enjoyed the training.
K. Clarke, HSBC (Indesign training Birmingham)
Very first time I have used Captivate and it was a great start.
A. Kaczmarczyk, Learn Direct (Adobe Captivate training Sheffield)
I'd just like to say a big thank you to you on behalf of all the attendees. We thoroughly enjoyed the training.
A Hall, Royal Liverpool University Hospital (Adobe Captivate training Liverpool)
The training was great and the trainer was marvellous.
S. Hart, Chester Grosvenor Hotel (Adobe InDesign training Chester)
To book a training course simply call 0844 493 3699, or email info@foursquaretraining.co.uk
PhotoShop Courses North West of England Region
PhotoShop Courses Lancashire, Greater Manchester and Merseyside: Bolton, Lancaster, Liverpool, Manchester, Preston, Warrington, Altrincham, Barrow-in-Furness, Blackburn, Oldham
PhotoShop Courses Cheshire and Wirral: Birkenhead, Chester, Stockport, Ellesmere Port, Knutsford, Wallasey, Runcorn, Macclesfield, Crewe
PhotoShop Courses North East of England Region
PhotoShop Courses Northumberland and Tyneside: Alnwick, Newcastle-upon-Tyne, Morpeth, Hexham, Berwick-upon-Tweed
PhotoShop Courses County Durham: Durham, Sunderland, Stockton-on-Tees, Darlington, Gateshead, Washington, Hartlepool
PhotoShop Courses Yorkshire and the Humber Region
PhotoShop Courses West Yorkshire: Leeds, Bradford, Halifax, Huddersfield, Brighouse, Wakefield, Shipley, Dewsbury, Bingley
PhotoShop Courses North Yorkshire: York, Harrogate, Scarborough, Whitby, Northallerton, Middlesbrough
PhotoShop Courses South Yorkshire: Sheffield, Barnsley, Doncaster, Rotherham, Worksop
PhotoShop Courses Humberside / East Riding of Yorkshire: Kingston-upon-Hull, Bridlington
PhotoShop Courses East Midlands Region
PhotoShop Courses Northamptonshire: Northampton, Corby, Kettering, Wellingborough
PhotoShop Courses Lincolnshire: Lincoln, Market Rasen, Grantham, Sleaford, Boston, Grimsby, Cleethorpes, Scunthorpe
PhotoShop Courses Nottinghamshire: Nottingham, Mansfield, Worksop, Newark-on-Trent, Retford, Southwell, Long Eaton, Alfreton
PhotoShop Courses Derbyshire: Derby, Chesterfield, Ilkeston, Swadlincote, Buxton, Matlock, Ashbourne
PhotoShop Courses Leicestershire: Leicester, Loughborough, Hinckley, Melton Mowbray, Coalville, Lutterworth
PhotoShop Courses West Midlands Region
PhotoShop Courses West Midlands county & Warwickshire: Birmingham, Coventry, Nuneaton, Rugby, Solihull, Stratford-upon-Avon, Warwick, Wolverhampton, Walsall
PhotoShop Courses Staffordshire: Cannock, Lichfield, Stafford, Stoke-on-Trent
PhotoShop Courses Worcestershire: Dudley, Evesham, Kidderminster, Stourbridge, Halesowen, Malvern, Worcester
PhotoShop Courses East of England Region
PhotoShop Courses Norfolk: Norwich, Great Yarmouth, King's Lynn, Dereham, Cromer, Hunstanton
PhotoShop Courses Suffolk: Ipswich, Bury St. Edmunds, Lowestoft, Felixstowe, Sudbury, Haverhill, Bungay
PhotoShop Courses Essex: Chelmsford, Basildon, Romford, Southend, Colchester, Harlow, Brentwood, West Ham
PhotoShop Courses Cambridgeshire: Cambridge, Peterborough, Wisbech, Ely, March, Whittlesey, Chatteris, Linton
PhotoShop Courses Hertfordshire: Hertford, Watford, St. Albans, Hemel Hempstead, Stevenage, Hatfield
PhotoShop Courses Bedfordshire: Bedford, Luton, Dunstable, Leighton Buzzard, Biggleswade, Sandy
PhotoShop Courses Greater London Region
PhotoShop Courses London Central: London, Camden, Hackney, Hammersmith, Haringey, Islington, Kensington, Chelsea, Lambeth, Southwark, Wandsworth, City of Westminster
PhotoShop Courses London East: Bethnal Green, Bow, Chingford, East Ham, Hackney, Manor Park, Plaistow, Stratford, Victoria Dock, Walthamstow, South Woodford
PhotoShop Courses London South West: Chelsea, Clapham, Earls Court, South Kensington, Stockwell, West Brompton
PhotoShop Courses Battersea: Barnes, Mortlake, Putney, Streatham, Wandsworth, Wimbledon, West Wimbledon
PhotoShop Courses Paddington: Chiswick, Ealing, Hammersmith, Kensington, Maida Vale, North Kensington, Notting Hill, Shepherds Bush, West Ealing, West Kensington
PhotoShop Courses South West of England Region
PhotoShop Courses Somerset: Taunton, Bath, Bridgwater, Weston-super-Mare, Yeovil, Wells, Glastonbury
PhotoShop Courses Dorset: Dorchester, Bournemouth, Poole, Sherborne, Shaftesbury, Wimborne Minster, Weymouth
PhotoShop Courses Wiltshire: Trowbridge, Salisbury, Swindon, Chippenham, Devizes, Marlborough, Warminster
PhotoShop Courses Gloucestershire: Gloucester, Bristol, Cheltenham, Stroud, Cirencester, Tewkesbury
PhotoShop Courses South East of England Region
PhotoShop Courses Berkshire: Reading, Slough, Bracknell, Maidenhead, Newbury, Windsor, Wokingham
PhotoShop Courses Buckinghamshire: Aylesbury, Milton Keynes, Buckingham, High Wycombe
PhotoShop Courses Oxfordshire: Oxford, Abingdon, Banbury, Witney, Bicester, Henley-on-Thames, Carterton, Thame
PhotoShop Courses Hampshire: Winchester, Southampton, Portsmouth, Basingstoke, Newport
PhotoShop Courses Kent: Maidstone, Canterbury, Bromley, Rochester, Margate, Folkestone, Dover, Greenwich
PhotoShop Courses East and West Sussex: Chichester, Brighton, Worthing, Crawley, Hastings, Eastbourne, Bognor Regis, Horsham